The bansuri, a traditional Indian flute, holds a significant place in Indian music and culture. Its elegant and elongated shape, with finger holes and decorative details, makes it a captivating subject for artists. In this step-by-step guide, we will explore the art of drawing the bansuri, unraveling its intricate form and capturing its essence on paper. Whether you are a beginner or an experienced artist, this guide will provide you with the techniques and insights to master the art of drawing the bansuri.
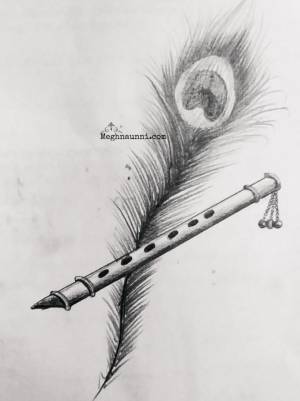
- Understanding the Anatomy of the Bansuri: Before diving into the drawing process, familiarize yourself with the structure and details of the bansuri. Study its long cylindrical body, the positioning and spacing of finger holes, the mouthpiece, and any additional decorative elements. Observe its proportions and unique characteristics, as this understanding will guide your drawing.
- Sketching the Basic Shape: Begin by lightly sketching the basic shape of the bansuri. Start with a vertical line to represent the centerline of the flute. Then, lightly draw the outline of the cylindrical body, ensuring the proportions are accurate. Pay attention to the tapering ends and the curvature of the bansuri.
- Adding Finger Holes and Details: Once the basic shape is sketched, proceed to add the finger holes and other details. The bansuri typically has six to eight finger holes, spaced at specific intervals along the body. Use reference images or a real bansuri as a guide to accurately position and size the finger holes. Pay attention to the spacing and alignment, as they contribute to the authenticity of the drawing. Additionally, add any decorative elements such as rings, bands, or carvings if present on the bansuri you are depicting.
- Refining the Outline and Proportions: Refine the outline of the bansuri, making it more defined and precise. Pay close attention to the subtle curves, ensuring they flow smoothly. Adjust any proportions or shapes that may require tweaking to accurately represent the bansuri’s form.
- Adding Shading and Depth: To bring the bansuri to life, incorporate shading and depth into your drawing. Observe the light source and determine the areas of light and shadow on the bansuri. Use light, controlled pencil strokes to create gradual shading, emphasizing the cylindrical shape and adding dimension to the drawing. Pay attention to the reflective surfaces and highlights on the bansuri to add further realism.
- Fine Details and Textures: Focus on adding fine details and textures to enhance the authenticity of the drawing. Study the texture of the bansuri’s surface and replicate it using light cross-hatching or stippling techniques. Pay attention to the details on the finger holes, the mouthpiece, and any decorative elements. Be patient and meticulous in capturing these intricate features.
- Erasing Guidelines and Refining: Carefully erase any remaining guidelines and smudges, ensuring that your drawing appears clean and polished. Take a step back to assess the overall composition and make any necessary refinements to the bansuri’s shape, shading, or details.
- Adding Background and Finishing Touches: Consider adding a complementary background to enhance the bansuri’s presence in the drawing. It could be a simple color wash or a detailed setting. Finally, add any finishing touches or highlights to bring out the vibrancy of the bansuri and make it visually captivating.
Drawing the bansuri requires patience, attention to detail, and a deep appreciation for its unique form. By following the step-by-step guide and allowing your creativity to flow, you can master the art of drawing this traditional Indian flute. Let your artwork reflect the elegance and musicality of the bansuri, capturing its essence.