Pencil shading is an essential skill for any artist, allowing you to bring depth, form, and realism to your drawings. Whether you’re a beginner or looking to refine your shading skills, this step-by-step guide will provide you with the foundation to master basic pencil shading techniques. By following these steps and practicing regularly, you’ll soon be able to create stunning shaded drawings that capture the essence of your subjects.
- Gathering Your Materials: Before you begin, gather the necessary materials: a range of pencils (H-grade and B-grade), an eraser, smooth paper suitable for shading, and a blending tool (optional). Having the right tools will make the shading process smoother and more enjoyable.
- Understanding Light and Shadow: To achieve realistic shading, it’s crucial to understand how light interacts with objects. Study the direction and intensity of light sources, and how they cast shadows on your subject. Identify the areas of highlight, mid-tone, and shadow, as this will guide your shading process.
- Starting with Light Pressure: Begin by applying light pressure on your pencil. This initial layer will act as a foundation and allow for adjustments later. Use light, even strokes to create an outline or basic shapes of your subject. Remember to observe the reference or real-life object carefully for accurate proportions.
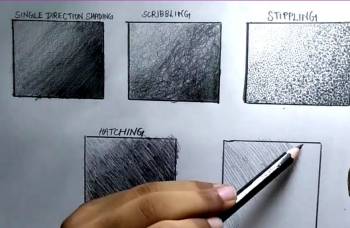
- Building Up Layers: To create depth and gradation, gradually build up layers of shading. Increase the pressure on your pencil, applying more graphite to darken the shadows and mid-tones. Experiment with different stroke directions, such as horizontal, vertical, diagonal, or circular, to achieve varied textures and effects.
- Blending and Smoothing: To achieve a smoother and more seamless look, consider blending your shading. You can use a blending tool or even your finger to gently blend the layers together, creating a gradual transition between tones. Blending is particularly effective for achieving softer textures or creating realistic skin tones in portraits.
- Creating Highlights: Highlights are the areas where light directly hits an object. To create highlights, carefully observe your subject and use an eraser to lift off some graphite or create lighter areas. This technique helps to enhance the three-dimensionality of your drawing.
- Refining Details: Once the basic shading is complete, focus on adding finer details. Use a sharper pencil or a lighter touch to add intricate textures, patterns, or subtle variations in shading. Pay attention to small highlights and shadows that contribute to the overall realism of your drawing.
- Practice and Experiment: Improving your pencil shading skills requires practice and experimentation. Challenge yourself by shading different subjects, exploring different lighting conditions, and experimenting with various techniques. Each drawing you complete will contribute to your growth as an artist.
Mastering basic pencil shading techniques is an essential skill for any artist. By understanding light and shadow, building up layers, blending, and adding highlights, you can bring depth and realism to your drawings. With practice and patience, you’ll develop your unique shading style and create breathtaking artworks that capture the essence of your subjects. So pick up your pencils, embrace the shading process, and let your creativity shine through!